First of all I got the idea from one of the camera magazines who published an article showing how to produce the image.
What you need
1, A table top
2, bluetac
3, cards
4, a torch, preferably a Mini Maglight type.
5, tripod and
6, a camera of course,
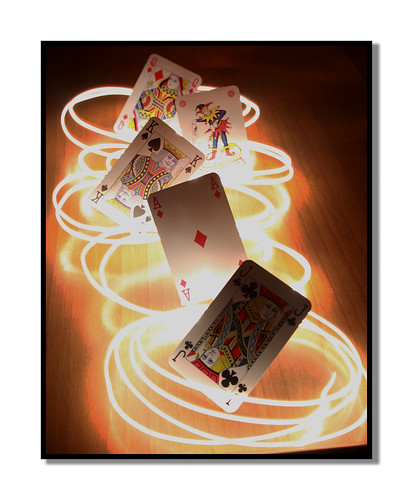
To set up the cards use the bluetac to hold the cards standing on one corner as can be seen in the photo below, try to hide the bluetac behind the playing card so that it won't be seen in the final image.

Next setup the camera on a tripod in front of the cards, try to ensure that there is nothing else in the image other than the table top and the cards, move the camera/tripod up or down to get the composition to your liking.

Camera Settings
Next set your camera to Manual "M" on most camera dials, set the ISO to 100
the lens I had on the camera was a standard zoom, mine is a 18-70, it was zoomed at around 35mm.
The next things that needs to be set is the shutter speed.
Setting the shutter speed is simply a trial and error thing to get the timing of the torch. The length of time the shutter is open will not affect the exposure as the light source is so small and is constantly moving.
In my case I set it finally at 5sec as this was the time it took to move the light down one side of the playing cards swishing in and out behind each card with the light constantly moving. If you find moving the light along the path takes you a little longer or a little shorter time then change your shutter speed accordingly.

Now you can take the lens off the torch so the bulb is fully exposed.
That's almost everything set, everything except the aperture, to start with set it to around f8 or so as it is in the middle of the aperture range and a good starting point.
Now take a test shot to work out what actual aperture you are going to need, turn off all the lights so the room is in complete darkness except for the torch. Now take the first shot while moving the torch along one side of the cards as before, once the shot is taken take a look at the image in the camera's screen to see how the image turned out.
If the light trail is to dark then simply open the aperture more by changing to f4 or f3.
If the light trail is to bright and washed out then close the aperture more by changing to f16 or f22.
Take another shot and adjust the aperture again until your happy with the result.
it should look something like this.

Once your happy, take a series of shots until you get four light trails two down each side of the cards which you are happy with.
Here are my four.

That's the first part done, in the next part I will explain how I combined the four images to get the result that you see above.
Here is a link to the second part of the tutorial
Many thanks
Francis Quigley.
No comments:
Post a Comment